Thursday, August 11, 2011

Winner Winner! Cookbook Winner!

I realize I am a few days late posting this. But, this has been a hectic time of year. Coming back from vacation and immediately starting to get Princess Runwild ready to start school. Whew!
So, no more delays....The winner of Whitney Miller's cookbook Modern Hospitality is

Cindy
cindyskitchen@yahoo.com

Cindy, I have sent you an email. If you can send me your mailing address, we will have this shipped out to you.

Thanks for all your comments!! I will be back with a recipe within a few days after I get everything settled down a bit.

Take Care,


Monday, July 25, 2011

No Name Bars & A Cookbook Giveaway!


"In 2010, America watched amateur cook, Whitney Miller, crush the competition and become the first winner of FOX’s hit show MasterChef. The seemingly demure Mississippi belle proved she had not only nerves of steel but true culinary chops. Now, in her eagerly anticipated first cookbook MODERN HOSPITALITY: Simple Recipes with Southern Charm, Whitney treats readers to a fresh take on classic dishes that have been passed down throughout generations of Southern women in her family."1
When Gordon Ramsay, one of the judges for MasterChef,  first met Whitney Miller, her humble and soft spoken attitude was said to make Gordon think "she was a sweet lamb heading toward inevitable slaughter."2 Yet, I believe they strongly underestimated the southern belle from Poplarville, Mississippi. In the end, with a dish of fried chicken and creamed collard greens, Ms. Whitney Miller became the winner of Masterchef. Since Masterchef, she has gone on to open a successful cafe and catering business and has written her first cookbook, MODERN HOSPITALITY: Simple Recipes with Southern Charm.
I was honored to be asked to review Ms. Millers cookbook. The cookbook is simply stunning. There is a beautiful shabby-chic appeal in all the page coloring and  food photography. Lots of interesting vintage linens paired with mouth watering recipes. I love Whitney's merging of her favorite recipes with the beautiful southern table settings. The lovely bone china tea cups filled with her Game Day Chili (on page 46), is perfect example. It's what her cookbook is all about. Modern hospitality... mixing the old with the new and embracing southern charm at its finest.
Of course, you know me. My very favorite part of the cookbook would include something from the sweet selections. After much deliberation in choosing the first recipe to try,  I finally decided on a recipe called No Name Bars. Ms. Miller indicates they "are too good for words," hence the reason she had trouble giving them a name. No doubt, she nailed it right on the head. The bars are similar to a gooey butter cake or a chess bar, but they have a very buttery crust with a filling that is a cross between that of a cheesecake and a custard. Their simplicity makes it easy to top them with anything from a sweet fruit reduction to a chocolate sauce. Or, you could just leave them plain and consume half a pan, as is. That appeared to be my preference:)
Enjoy!  

No Name Bars
from MODERN HOSPITALITY: Simple Recipes with Southern Charm by Whitney Miller 
Ingredients:
Crust:
1 1/2 sticks, unsalted butter, melted
3/4 c. white granulated sugar
1 1/2 all purpose flour
1/2 tsp baking powder
1/2 tsp baking soda
1/2 tsp salt
1 tsp vanilla extract

Filling:
1 pkg (8oz) cream cheese, softened
2 large eggs
4 TBSP unsalted butter, melted
1 tsp vanilla extract
3 1/2 c powdered (confectioner's) sugar

Preheat oven to 350 degrees. Grease 9x13 baking dish.
 To make the crust: Mix the butter and white sugar together in a med. bowl. In another bowl combine the flour, baking soda, baking powder and salt. Add flour mixture to salt mixture and mix until combined. Spread into greased baking dish. 

For filling:
Beat cream cheese with mixer until smooth. Add the eggs and mix. Stir in the melted butter and vanilla. Add powdered sugar. Spread on top of crust. Bake for 38 minutes. Let cool at least 5 minutes before cutting into squares.  

GIVEAWAY TIME!!!!
If you'd like to win your own copy of Whitney's cookbook MODERN HOSPITALITY, you are in luck. Along with my review copy, I was offered the chance to giveaway a copy to one of my Sinful Southern Sweets readers! So, its very simple, just leave me a comment, any comment (well, preferably a nice one:). You can leave up to 3 comments per day. The giveaway will end August 7th. Winner will be chosen randomly. Please make sure to include your email if its not listed in your profile. Good luck!!

BOOK SIGNINGS AND EVENTS FOR WHITNEY MILLER
July 7th - EveryDay Gourmet - Jackson, MS, Book signing
July 8th - TurnRow Books- Greenwood, MS, Book signing
July 8th - Viking Cooking School - Cooking demo (6 -7:30 pm)
July 9th - Uptown Interiors- Bay St Louis, MS, book signing
July 11th - Square Books - Oxford, MS, book signing (5-7 pm)
July 12th - L’Ecole Culinaire, cooking demo and book singing (12-2pm)
July 12th - The Booksellers at Laurelwood- Memphis, TN - book signing (6-8pm)
July 14th - Page & Palette - Fairhope, AL, cooking demo and book signing
July 15th - Apple's Limited - Poplarville, MS, book signing (5-7pm) 
July 16th - Viking Cooking Classic- Madison, MS, cooking demo and signing
July 19th - Melinda's Fine Gifts and More - Picayune, MS, book signing (6-8 pm)
July 22nd - Sam’s Club- McDonough, GA, book singing
July 24th - Women’s Health “Are You Game” event- Chicago, IL, cooking demo and book signing (11am-4pm)
July 29th-30th - MS's Hospitality Pageant - Hattiesburg, MS, celebrity judge and book signing
August 4th - Books a Million - Birmingham, AL, book signing (12noon-2pm)
August 6th - Barnes & Noble- Savannah, GA, book signing (2-4pm)
August 13th - Books a Million - Slidell, LA, book signing (12-2 pm)
August 15th - The Kitchen Table- Hattiesburg, MS, cooking demo and book signing
1/reference from Rodale publicity release
2/reference from forward by Gordon Ramsay from MODERN HOSPITALITY


Tuesday, July 12, 2011

Sinful Salty & Sweet Brownies


Do you ever have days when you just want to consume your entire caloric expenditure in junk??
No....
Oh....No, I don't either...
Often.....
Ok, so not this week, but its only Tuesday.

Anyways, if we were going to be crazy and just force ourselves to indulge in quite possibly the most sinful treat ever, I was thinking this Sinful Salty & Sweet Brownie might fit the bill. I concocted it one day when I might have been having a bit of a need for junk food. It combines the very best of both salty and sweet. Hidden within this gooey caramel brownie resides the following:
1)Chocolate Covered Pretzels, 2) Mars Candy Bars (which I completely forgot existed until I was scouting out the candy isle at Walmart one day) 3)Caramello Bars (Oh how I love thee...) and  4) Potato chips (you can use the light/fat free potato chips if it makes you feel better). Its all baked in a Ghiradelli Caramel Turtle Brownie Mix. Yes, I kid you not. Its all in there. So, if you're serious and you've never wasted all your daily calories on junk food....well, my  friend, its never too late!

Enjoy!

Sinful Salty & Sweet Brownies

Ingredients:
Ghiradelli Caramel Turtle Brownie Mix
1 egg
1/3 c. oil
1/4 cup water
2 Mars candy bars, chopped
3 Caramello bars, chopped
1/2 c potato chips, crushed
1/2 bag Flipz milk chocolate covered pretzels, chopped

Preheat oven to 325 degrees. Mix together the brownie mix (set aside the caramel packet), egg, oil and water. Into a greased 9x9 pan, spoon half the brownie mixture. Top brownie mixture with Mars bars, potato chips, choc. covered pretzels and caramello bars. Spoon theremaining brownie mixture over previous layer. Drizzle caramel (from brownie mix) over the top. Gently swirl into mixture.
Bake at 325 degrees for 36-40 minutes.


Sunday, July 3, 2011

Patriotic Fruit Pizza


You can turn on nearly any news channel and see countries around the world battling it out for what we all take for granted...Freedom. We have no real concept of what these countries experience on a day to day basis. For the last 235 years, we have had men and women leaving their families and loved ones to defend our country so that we do not ever have to know what a country without freedom is like to endure.

It was once said "This country isn't perfect, but the concepts on which this great nation were founded - life, liberty and the pursuit of happiness - most certainly are." While you're celebrating and grilling out and having a relaxing and enjoyable fourth of July weekend, lets all remember those men and women that have fought and continue to fight to keep our country free.


OK, so now that I'm off my patriotic soapbox, lets talk recipes. Its the day before the 4th. So, you've still got time to wrap up your sweet treat for tomorrow. Today's recipe is easy enough that it won't keep you in the kitchen all day, so you can make it today and relax all day tomorrow. Really, you could make it tomorrow and still enjoy the day.

This is called a Fruit Pizza, but it is not like a traditional pizza. It is more like a huge cookie topped with fruit and a frosting.If you want to skip some steps, you could substitute a refrigerated cookie dough for the crust on this recipe. Just bake it until its golden brown, and let cool completely. If you really wanted to cut corners, you could skip the cream cheese frosting and just use refrigerated whipped cream (the kind in the can). I'm not sure I'd be willing to part with the cream cheese frosting since I have tried it, but if you've not tried it, you won't know what you're missing out on anyways:)

OK, and if you're just a complete bum, you could go to the grocery store and buy one of the huge pre-made cookies from the bakery section. Scrape off the icing and start building on your cookie. Whichever way you decide, I hope you have a sweet and safe 4th of July!!
Enjoy!

Patriotic Fruit Pizza
Recipe via Taste of Home

Ingredients

  • CRUST:
  • 1 cup all-purpose flour
  • 1/2 cup confectioners' sugar
  • 1/2 cup cold butter

  • AMERICAN FLAG:
  • 2 packages (8 ounces each) cream cheese, softened
  • 1 cup sugar
  • 1 teaspoon vanilla extract
  • 1/2 teaspoon lemon juice
  • 2 cups halved fresh strawberries, 1/2 cup fresh blueberries

Directions

  • Crust: In a bowl, combine the flour and confectioners' sugar. Cut the butter into the dry ingredients until crumbly. Press the mixture onto a greased 12-in. pizza pan. Bake at 325° for 10-15 minutes or until the crust is lightly browned. Let cool.
  • American flag: In a bowl, beat the cream cheese and sugar. Add the vanilla and lemon juice, mixing until smooth. Spread 1 cup cream cheese mixture over the crust. Set the remaining cream cheese mixture aside.
  • Referring to the photo for position, arrange five rows of strawberries on top of the pizza to create the red strips of flag. Place the blueberries in the upper left corner.
  • Cut a hole in the corner of the plastic or pastry bag and insert the star tip. Fill the bag with the reserved cream cheese mixture. For the white stripes, pipe a zigzag pattern between the rows of strawberries.


Sunday, June 12, 2011

Friendship Bread Starter & Printables for Gifting!


Friendship Bread, also refered to as Amish Friendship Bread, has been a popular tradition for nearly 3 decades. Though often called Amish, it is said the bread did not derive, nor have any connection with the Amish. I don't know too much about its origins, but I know its a fabulous recipe and definitely entertaining. At least through the first several batches of starter:)
You should be warned. Usually, people have one of two reactions to Friendship Bread starter:
1) They have never seen or heard of it, and they are intrigued and delighted that you were so kind to think of them and share your starter (these are the people you want to seek out when you start dividing up your starter. Try to hide your sinister laugh as you pass along the bag. Just smile sweetly and pretend to be that gracious lady/gentlemen that loves to bring others joy.Sometimes ignorance is best:)
2) If the individual you are attempting to gift the starter to is not terribly interested in baking or perhaps they have been gifted the starter previously they may grumble at you or in worse case scenario, run the other way. Now, no offense is to be taken from these people. The thing is that when you make the starter for friendship bread, you mush the bag for 10 days, adding some ingredients on day 6 and on day 10 you divide the starter up and give 3 bags away, keep one for yourself and bake with the leftover starter from the previous batch. Well, if you keep a starter, you will divide again in 10 days and again in another 10 days and so on. What I'm getting at here is that the starter tends to multiply like bunnies.

If you haven't read the book Friendship Bread by Darien Gee, I highly recommend it! It is a great novel incorporating the funny tactics of getting rid of friendship bread starters, and how a small town pulled together to put the thousands of multiplied starters to use for a good cause.  You'll get pulled into the Friendship Bread Phenomenon, just like I did! I loved the Info section over at Friendship Bread Kitchen that ends the description with this:

"At the end of the day, Amish Friendship Bread is all about friendships and community. It’s about connection. It’s about fun. It’s about nurturing other people. It’s about not taking anything too seriously, but to find the simple joy and pleasure in every moment. Amish Friendship Bread is, in short, a recipe for living."


If the thought of finding individuals to share your starter with scares you, don't let it. There are other options. For instance, the starter freezes beautifully. Or just bake all the starter after 10 days and there is no more gifting or baking. Whatever course you choose, I highly recommend you give this recipe a try. If you have small children, I assure you they will love both the nurturing of the starter and the baking of the bread. My little Runwild Princesses fought all 10 days about who could "mush" the bag.
We just had to let everybody have a go at mushing the bag each day. Who knew the entertainment factor would be so high?!?

And as a little added incentive both to get you to try the recipe and to have luck giving it away, I made y'all a few cute little mermaid themed printables. I'm not sure why I choose mermaids, but I like them. Hope you do too!

So here's what you do. First print out the Friendship Bread tags here. Then print out the sheets with the Friendship Bread instructions here. You will need to get some kind of bag for gifting. I used plain white gift bags because I had those on hand for some reason. On day 10, separate your starters and bake your bread. Wrap up the bread, attaching the tags.

In the gift bag, include the instructions, a sample of the friendship bread and a bag of starter. Tie an extra label on the outside of the bag to make it extra fancy:)


Now here are the instructions beginning with the Starter. If someone has already gifted you a starter, you are in luck and can just use the printouts.

**Note: I have never mentioned this before, but please, please, please do not sell my printables. I don't sell them and nor should you:) These are for gifting purposes only.


Friendship Bread
Recipe from: Friendship Bread Kitchen
Starter:
Ingredients
1 (0.25 ounce) package active dry yeast
1/4 cup warm water (110° F/45° C)
1 cup all-purpose flour
1 cup white sugar
1 cup milk
Directions
  1. In a small bowl, dissolve yeast in water. Let stand 10 minutes.
  2. In a 2-quart glass, plastic or ceramic container, combine 1 cup flour and 1 cup sugar. Mix thoroughly with a whisk or fork.
  3. Slowly stir in 1 cup milk and dissolved yeast mixture.
  4. Cover loosely and let stand at room temperature until bubbly. Pour into a plastic ziptop bag, if desired. Consider this day 1 of the 10 day cycle. For the next 10 days handle starter according to the instructions for Amish Friendship Bread.
Notes:
The starter should be left at room temperature. Drape loosely with dish towel or plastic wrap. Do not use metal utensils or bowls. If using a sealed Ziploc bag, be sure to let the air out if the bag gets too puffy.
NOTE: Do not refrigerate starter. It is normal for the batter to rise and ferment. If air gets in the bag, let it out.
Instructions for Starter:
Day 1: Do nothing.
Day 2: Mash the bag.
Day 3: Mash the bag.
Day 4: Mash the bag.
Day 5: Mash the bag.
Day 6: Add to the bag: 1 cup flour, 1 cup sugar, 1 cup milk. Mash the bag.
Day 7: Mash the bag.
Day 8: Mash the bag.
Day 9: Mash the bag.
Day 10: Follow the directions below:
  1. Pour the entire bag into a nonmetal bowl.
  2. Add 1 1/2 cup flour, 1 1/2 cup sugar, 1 1/2 cup milk.
  3. Measure out 4 separate batters of 1 cup each into 4 (1-gallon) Ziploc bags.
  4. Keep one of the bags fr yourself, and give the other bags to 3 friendship along with the recipe.
REMEMBER: If you keep a starter for yourself, you will be baking in 10 days. The bread is very good and makes a great gift.
Should this recipe not be passed onto a friend on the first day, make sure to tell them which day it is when you present it to them.
BAKING INSTRUCTIONS:
1. Preheat oven to 325 degrees F.
2. To the remaining batter in a bowl add the following:
a. 3 eggs
b. 1 cup oil
c. 1/2 cup milk
d. 1 cup sugar
e. 1/2 teaspoon vanilla
f. 2 teaspoons cinnamon
g. 1 1/2 teaspoons baking powder
h. 1/2 teaspoon salt
i. 1/2 teaspoon baking soda
j. 2 cups flour
k. 1-2 boxes instant pudding (any flavor)
i. Optional: 1 cup nuts and 1 cup raisins
3. Grease 2 large loaf pans
a. In a bowl mix an additional 1/2 cup sugar and 1 1/2 teaspoon cinnamon.
b. Dust the greased pans with the cinnamon-sugar mixture.
4. Pour the batter evenly into the pans and sprinkle the remaining cinnamon-sugar mixture on the top.
5. Bake for one hour or until the bread loosens evenly from the sides and a toothpick inserted in the center of the bread comes out clean.
6. ENJOY!

Additional info:
There are a multitude of recipes to use this starter for. The one above is just the basic recipe. My Mother in Law had called a few days ago asking if there was a savory recipe to be used with the starter. I did not think there was, but I did actually end up finding several at the Amish Friendship Kitchen. So, if get bored with the basic recipe, just go look in the Friendship Kitchen recipe box and you'll find everything from Brownies to Cheesy Sourdough to Zucchini Bread. The possibilities are endless.
Have Fun and Enjoy!


Wednesday, May 25, 2011

"You Take The Cake" Jar Cakes-Teacher Thank You Gift


Where has our year gone?!?! Just yesterday it seems, I was posting about Back to School Cupcakes and my Princess Runwild was starting a new phase of life as a kindergartener. Now, here we are finishing up her last week as a kindergartener…But that’s ok, at least I won’t have to listen to little sister, Runwilder, scream every morning as we drop her  big sister off at school. I kid you not, every single day that we have taken Runwild to school, Runwilder has screamed after her as she gets out of the car “I need you!!” I thought it would only last the first few weeks of school, but no….every single school day

So, as the school year comes to an end, you may be looking for a little gift for your teachers. That’s what I’m sharing today. Its not so much a recipe, as in idea. If you’re short on time, you can simply go to the store and buy a pack of premade cupcakes. You’ll need a mason jar, cupcakes, sprinkles and this oh- so- cute printable I’ve made for you. 

You can download the printable here.

Oh, and some ribbon would also be nice.

Its very simple. Just stack a few cupcakes in that jar (I used 3 cupcakes). Add Sprinkles in between the layers if you want to make it extra special. Put the top on and tie/tape on the tag. I know it seems simple, but who wouldn’t love this. Its cake…in a jar.

Portable Perfection! The only think that would make these teachers love you more is if you sent them a plastic fork so they don’t have to wait to eat it. And, don’t forget to let your little one sign the tag.
Enjoy!


Wednesday, May 18, 2011

Carrot Cake,,,and An Easter Recap


I realize Easter has come and gone, but since my recipe today was actually my Easter dessert , I thought we’d  just have an entire Easter recap.
So in a nutshell,
The Easter Bunny did in fact come.
Which was a surprise even to Princess Runwild. She told me later, that she was nearly certain she had NOT been a good girl.….
There was some egg dying...


The drying of the eggs was nearly too much for Princess Runwild….


There was a bit of Egg Hunting….


Princess Runwilder didn’t stand a chance. Her older sister had years more experience. She was a kid on a mission. God love her, if she’d only known I was going to make them divide them equally….


There was even the excitement of the loss of a first tooth!…..


And the sweet ending to a fabulous Easter?
Carrot Cake!


There’s not too much to know about this carrot cake. Except that its moist, it makes nice deep layers and you will love it! Oh, wait..you should know that the layers are sooo deep that you may have a hard time finding a cake carrier for transport, if you’re taking it to someone elses house. I had to wrestle it into a plastic storage container. The kind you generally store clothes in, but I’m pretty sure nobody cared :)Hope you had a wonderful Easter!
Enjoy!

Southern Carrot Cake

Ingredients

  • 4 eggs
  • 1 1/4 cups vegetable oil
  • 1cup white sugar
  • 1 cup brown sugar
  • 8 oz can crushed pinapple, drained
  • 3 teaspoons vanilla extract
  • 1/4 tsp nutmeg
  • 2 cups all-purpose flour
  • 2 teaspoons baking soda
  • 2 teaspoons baking powder
  • 1/2 teaspoon salt
  •  3 teaspoons ground cinnamon
  • 3 cups grated carrots
  • 1/2 cup chopped pecans
  •  
  • 1 cup butter, softened
  • 16 ounces cream cheese, softened
  • 8 cups confectioners' sugar
  • 2 teaspoon vanilla extract
  • 2 cup chopped pecans

Directions

  1. Preheat oven to 350 degrees F (175 degrees C). Grease and flour a 9x13 inch pan.
  2. In a large bowl, beat together eggs, oil, sugars and vanilla. Mix in flour, baking soda, baking powder, salt, nutmeg and cinnamon. Stir in carrots and pineapple. Fold in pecans. Pour into prepared pan.
  3. Bake in the preheated oven for 40 to 50 minutes, or until a toothpick inserted into the center of the cake comes out clean. Let cool in pan for 10 minutes, then turn out onto a wire rack and cool completely.
  4. To Make Frosting: In a medium bowl, combine butter, cream cheese, confectioners' sugar and 1 teaspoon vanilla. Beat until the mixture is smooth and creamy. Frost the cooled cake.Press pecans around the side of cake for decoration.


Thursday, April 21, 2011

Easter Basket Cupcakes


Wanna be the best mom/dad/grandparent/aunt/uncle, etc in the whole world??? Yeah, these'll do it. At least for the moment....or until that sugar high kicks in. Then you'll be a mean, uncool adult again.
 I  just don't know when it happened.You know, being "uncool," as a parent. I think its when that little 'Beiber Boy' entered the picture last fall....I just don't think its right for a 5 yr old to have "Beiber Fever." I'm not 100% I know what Beiber Fever is, but I'm pretty sure I don't want my Runwilder Princesses to have it. Right? Oh well, if cute little bunny cupcakes baked in a waffle cone cup and piled high with icing and sugary confections makes me cool for 5 minutes, well, I'm gonna take it.

Besides, how cute would these be on your Easter table. And the waffle cone bowls really make a cute basket. But, if you don't have them and don't want to go to the store, you can simply use cupcake liners. IF, you fall into that Type A personality category and feel the need to match the color of the cupcake to the basket (waffle cone), use a caramel cake mix. (I'm not type A, I just happened to have a caramel cake mix on hand and I decided it did in fact make a perfect match:) Oh, and make sure you stick the twizzlers (handle) down into the actual cake part of the cupcake and not just into the icing. You don't want to have you're basket handle flapping around and flinging icing all over the place. That wouldn't make a very stunning Martha Stewartesque Easter Table, now would it??:)

Enjoy!

Easter Basket Cupcakes
Recipe from"Cupcakes! From the Cake Mix Doctor" by Anne Byrn

CUPCAKES:

  • 1 box (7 ounces) waffle bowls (10 to a box)
  • 1 package (18.25 ounces) plain white cake mix
  • 1 package (3.4 ounces) vanilla instant pudding mix
  • 1/2 cup milk
  • 1/2 cup vegetable oil
  • 2 large whole eggs
  • 2 large egg whites
  • 1 tablespoon coconut flavoring (optional)
  • Buttercream Frosting or Canned frosting
BUTTERCREAM FROSTING
  • 8 tablespoons (1 stick) butter, at room temperature
  • 3 cups confectioners' sugar, sifted
  • 3 to 4 tablespoons milk
  • 1 teaspoon pure vanilla extract
BASKETS:
  • 3/4 cup sweetened flaked coconut
  • 2 to 3 drops green food coloring
  • Assorted jelly beans
  • 10 strawberry-flavored Twizzlers (9 1/2 inches long) 
  • Lindt Chocolate Bunnies or similar easter candy

1. Place a rack in the center of the oven and preheat the oven to 350ºF. Wrap the outside of each waffle bowl in an 8-inch aluminum foil square, carefully tucking the edges of the foil just inside the top of the bowl. Place the bowls on a baking sheet and set aside.

2. Place the cake mix, pudding mix, milk, oil, eggs, egg whites, and coconut flavoring in a large mixing bowl. Blend with an electric mixer on low speed for 30 seconds. Stop the machine and scrape down the sides of the bowl with a rubber spatula. Increase the mixer speed to medium and beat 2 minutes more, scraping down the sides again if needed. Fill each bowl with a heaping 1/2 cup of batter. Place the baking sheet in the oven.


3. Bake the cupcakes until they are lightly golden and spring back when lightly pressed with your finger, 24 to 27 minutes. Remove the pan from the oven and place it on a wire rack to cool for 5 minutes. Gently peel off the aluminum foil and allow the bowls to cool to room temperature, 30 minutes.

4. Meanwhile, prepare the Buttercream Frosting (skip this step if you're using canned frosting). Place the butter in a large mixing bowl. Blend with an electric mixer on low speed until fluffy, 30 seconds. Stop the machine and add the confectioners' sugar, 3 tablespoons of the milk, and the vanilla. Blend with the mixer on low speed until the sugar is incorporated, 1 minute. Increase the speed to medium and beat until light and fluffy, 1 minute more. Add up to 1 tablespoon more milk if the frosting seems too stiff.

5. Place the coconut in a plastic bag with 2 drops of the green food coloring. Shake well until the coconut turns green. If the color isn't strong enough, add another drop of color, and shake again.

6. To assemble, place 2 heaping tablespoons of frosting on each cupcake and spread it out smoothly with a short metal spatula or a spoon, taking care to cover the tops completely. Immediately sprinkle on coconut to resemble grass and place a bunny in the middle and a pile of jelly beans on the coconut to resemble eggs. To create the basket handle, insert one end of a Twizzler in one side of the cupcake near the edge, then bend it over the cupcake and insert the other end on the opposite side. The cupcakes are ready to serve.

• Store these cupcakes for up to 1 day at room temperature. After a day, the cake will begin to pull away from the sides of the bowl.


Monday, April 18, 2011

Hula Girl Blondies and a Free Printable


My brother and his family have lived up north for a few years. On one of their recent visits, they brought me a sampling of brownies from a bakery that is located in a nearby town. Now, I soon came to discover, this bakery was not just any ole’ bakery. This bakery was Sugar Daddy’s.  And Sugar Daddy’s, if you’re not familiar with them, was in a Throwdown Brownie Battle with Bobby Flay on the Food Network. OK, so you know, not just everybody does battle with Bobby Flay. He picks the 'cream of the crop' to try to out cook, or bake, as the case may be. And, even so, most of the time, Mr. Flay is the winner. But, not with Sugar Daddy’s! They were deemed the “ Best of the Best.“ So, the brownies  I sampled were not just good, they were divine.
 But of course, if you want divine brownies/blondies that are baked by popular people that have been on the Food Network...well, the price starts getting steep. So steep that they sell the brownie scraps from their suave edgeless brownies,  in little baggies and call them “Pocket Change” for us folks that are not willing to dole out the full price for their fabulous round brownies. The “Pocket Change” is twenty bucks, just in case you're interested. Or you can throw caution to the wind and get 8 of the 3"round brownies for $55... Not saying they’re not worth it, just saying I’m cheap....And, if anyone wants some of my brownies, I only charge $45;) Hahahaha!

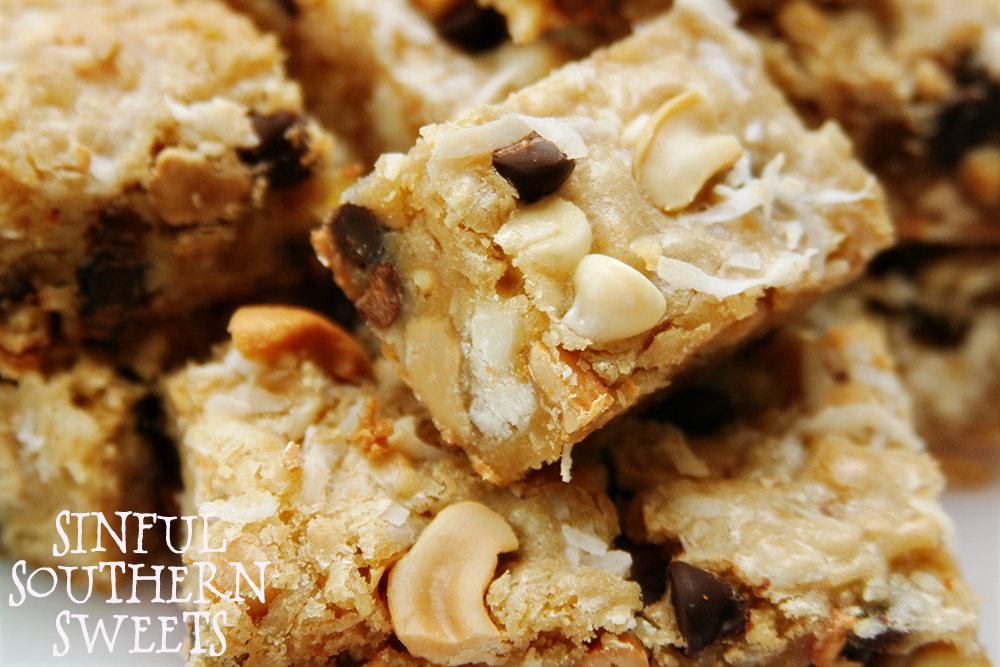
Ok, now that we've all had a good laugh...My brother’s favorite from Sugar Daddy’s was a tropical version with loads of coconut, pineapple, cashews and both white and semisweet chocolate. This is my version of that blondie. I call them Hula Girl Blondies. They are seriously good. I’m not sure Bobby Flay will be beating my door down for a Thowdown (which, Mr. Flay, just so you know, I never answer my door if Mr. Sweets is not home or unless I know you're coming. Call me paranoid:) or that  they are an exact duplicate of Sugar Daddy’s, but hey, they will be kinder to your pocketbook for sure!

Oh, and since I've been slacking on my posts a bit lately, I've made a 'Hula Girl Blondie' tag to try to bribe you to keep reading my blog :)
You know I have no problem with bribery...Use these tags when you decide to gift these lovely brownies to your kids teachers, your neighbors or your co-workers.
They probably won't mind being bribed either.
You can download the tags here

Enjoy!


Hula Girl Blondies
1 1/2 cup all purpose flour
1 tsp. baking powder
1/4 tsp. salt
1 1/2 cup brown sugar
3/4 cup butter, melted
2 eggs
4 tsp. vanilla
1  cup shredded sweetened coconut
1 cup chopped cashews
1/2 cup semi-sweet chocolate chips
1/2 cup white chocolate chips
1/2 cup dried pineapple, chopped

Preheat oven to 350 degrees F. Grease a 9 x 13 baking pan.
In a medium bowl, whisk together flour, baking powder and salt and set aside.
In another bowl, whisk together brown sugar and butter until combined. Add eggs and vanilla to mixture and mix well. Fold flour mixture into wet ingredients until combined.
Fold in coconut, cashews, chocolates, pineapple and into batter. Pour batter into prepared baking pan and smooth out to edges of pan. Top with extra coconut, chocolate and cashews if desired.
Bake for about 25-28 minutes, or until top light golder brown on the top. Do not over bake. Look for color rather than texture. Cool completely before slicing.


Sunday, March 27, 2011

Double Chocolate Cranberry Meringue Coffee Cake- Daring Baker's Challenge March '11


The March 2011 Daring Baker’s Challenge was hosted by Ria of Ria’s Collection and Jamie of Life’s a Feast. Ria and Jamie challenged The Daring Bakers to bake a yeasted Meringue Coffee Cake.


Recipe Source: Jamie found this recipe on a piece of yellowed paper in her dad’s collection of clipped out and hand-written recipes from the 1970’s, no source, no date, and she tried the recipe and it was brilliant!


This was a very interesting challenge. Once again, no need to be afraid of the yeast. Its really not difficult to work with, well, as long as you have fresh yeast and not something that's been living in your cupboard for years. Old yeast will undoubtedly give you rising issues. 

I was curious when I first read this challenge as to how the meringue would bake up inside the coffee cake. Its really amazing. The barely sweet brioche-like dough is rolled out jellyroll style and topped with fluffy meringue, dried cranberries, dark chocolate, white chocolate and pecans. The meringue that is inside the coffee cake just seems to melt into the cake and creates an unusual coating to the inside of the cake that gives it a touch of sweetness and creates a very moist interior. Its hard to describe, but trust me, its great! The meringue that peeks through the side slits on the coffee cake are slightly chewy and crisp. Needless to say, this coffee cake is out of this world when fresh from the oven. With no preservatives, I would certainly suggest that the yeasted coffee cake be consumed with one day. Of course, if you can make it last a full day, I would be most impressed! Enjoy!

When baking this recipe, you will have enough dough for 2 coffee cakes. I made one in a ring shape and one in a loaf pan.

If you make the loaf pan (which I highly recommend!), follow steps below (except save cinnamon and sugar for last step). After rolling up jellyroll style, slice off 1 inch spiral rolls. Place the rolls along the side of a greased loaf pan and then stack along the inside until all the spirals are used. Sprinkle with cinnamon and sugar mixture. Bake at 350 degrees for 30 minutes.


DOUBLE CHOCOLATE CRANBERRY MERINGUE COFFEE CAKE
Makes 2 round coffee cakes, each approximately 10 inches in diameter
The recipe can easily be halved to make one round coffee cake
Ingredients
For the yeast coffee cake dough:
4 cups (600 g / 1.5 lbs.) flour
¼ cup (55 g / 2 oz.) sugar
¾ teaspoon (5 g / ¼ oz.) salt
1 package (2 ¼ teaspoons / 7 g / less than an ounce) active dried yeast
¾ cup (180 ml / 6 fl. oz.) whole milk
¼ cup (60 ml / 2 fl. oz. water (doesn’t matter what temperature)
½ cup (135 g / 4.75 oz.) unsalted butter at room temperature
2 large eggs at room temperature

For the meringue:
3 large egg whites at room temperature
¼ teaspoon salt
½ teaspoon vanilla
½ cup (110 g / 4 oz.) sugar

For the filling:

1/2 cup (110 g / 4 oz.) chopped pecans or walnuts
2 Tablespoons (30 g / 1 oz.) granulated sugar
¼ teaspoon ground cinnamon
1/2 cup (170 g / 6 oz.) mini semisweet chocolate chips or coarsely chopped dark chocolate
1/2 cup (170g / 6 oz.) white  chocolate chips
1/2 c. dried (sweetened) cranberries
Egg wash: 1 beaten egg


Directions: Prepare the dough:
In a large mixing bowl, combine 1 ½ cups (230 g) of the flour, the sugar, salt and yeast.
In a saucepan, combine the milk, water and butter and heat over medium heat until warm and the butter is just melted.
With an electric mixer on low speed with bread hook, gradually add the warm liquid to the flour/yeast mixture, beating until well blended. Increase mixer speed to medium and beat 2 minutes. Add the eggs and 1 cup (150 g) flour and beat for 2 more minutes.
 Using a wooden spoon, stir in enough of the remaining flour to make a dough that holds together. Turn out onto a floured surface (use any of the 1 ½ cups of flour remaining) and knead the dough for 8 to 10 minutes until the dough is soft, smooth, sexy and elastic, keeping the work surface floured and adding extra flour as needed.
Place the dough in a lightly greased (I use vegetable oil) bowl, turning to coat all sides. Cover the bowl with plastic wrap and a kitchen towel and let rise until double in bulk, 45 – 60 minutes. The rising time will depend on the type of yeast you use.
Once the dough has doubled, make the meringue:
In a clean mixing bowl – ideally a plastic or metal bowl so the egg whites adhere to the side (they slip on glass) and you don’t end up with liquid remaining in the bottom – beat the egg whites with the salt, first on low speed for 30 seconds, then increase to high and continue beating until foamy and opaque. Add the vanilla then start adding the ½ cup sugar, a tablespoon at a time as you beat, until very stiff, glossy peaks form.

Prepare your filling:In a small bowl, combine the cinnamon and sugar for the filling if using. You can add the chopped nuts to this if you like, but I find it easier to sprinkle on both the nuts and the chocolate separately.Assemble the Coffee Cakes:
Line 2 baking/cookie sheets with parchment paper or use Silpat.

Punch down the dough and divide in half. On a lightly floured surface, working one piece of the dough at a time (keep the other half of the dough wrapped in plastic), roll out the dough into a 20 x 10-inch (about 51 x 25 ½ cm) rectangle. Spread half of the meringue evenly over the rectangle up to about 1/2-inch (3/4 cm) from the edges. Sprinkle half of your filling of choice evenly over the meringue (ex: half of the cinnamon-sugar followed by half the chopped nuts and half of the chocolate chips/chopped chocolate).
Now, roll up the dough jellyroll style, from the long side. Pinch the seam closed to seal. Very carefully transfer the filled log to one of the lined cookie sheets, seam side down. Bring the ends of the log around and seal the ends together, forming a ring, tucking one end into the other and pinching to seal.
Using kitchen scissors or a sharp knife (although scissors are easier), make cuts along the outside edge at 1-inch (2 ½ cm) intervals. Make them as shallow or as deep as desired but don’t be afraid to cut deep into the ring.
Repeat with the remaining dough, meringue and fillings.
Cover the 2 coffee cakes with plastic wrap and allow them to rise again for 45 to 60 minutes.
Preheat the oven to 350°F (180°C).
Brush the tops of the coffee cakes with the egg wash. Bake in the preheated oven for 25 to 30 minutes until risen and golden brown. The dough should sound hollow when tapped.


Sunday, February 27, 2011

Chocolate Panna Cotta & Florentine Cookies-February Daring Bakers Challenge


The February 2011 Daring Bakers’ challenge was hosted by Mallory from A Sofa in the Kitchen. She chose to challenge everyone to make Panna Cotta from a Giada De Laurentiis recipe and Nestle Florentine Cookies.

So, here's what you need to know about Panna Cotta and Florentine Cookies:

1) You will love it.
2) You will not respect yourself in the morning.
3)The hour you spend hoofing it on the treadmill will not even come close to accounting for the calories you will consume in one bite of this amazing dessert.
4)When you combine heavy cream and any form of sugar, there is a chemical process that takes place that creates a substance in desserts that is very, very similar to super glue. That glue makes all things stick to your ____________________(you can fill in the blank with your problem area..butt, hips, thighs, cankles, etc..).
5)This dessert is so absolutely worth it that you will for get about #1-4.

So, as you can tell, what I'm getting at here is this is seriously sinful stuff. No, you don't want to have it every night. But, make it for a dinner party, a girls night or make it for your sweetheart when you're having a date night at home. Its quite impressive when served in fine crystal glassware or even in individual ramekins. Its the perfect dessert for special occasions or holidays.

I will say upfront, the cookies were suppose to be spread with chocolate and sandwiched together. Honestly, after looking at the 2 cups of heavy cream in the panna cotta.... I just couldn't do it. But, if you're fearless and have no problem with the fact that your pants may not fit tomorrow. Well, then you go for it! But, even without the extra chocolate they were excellent. If you want the cookies to stand up for plate decor and be extra crisp, place them in the fridge after they've had time to cool.

Enjoy!

Chocolate Panna Cotta: 
Bon Appetit

Ingredients: 

1 cup whole milk
2 1/2 teaspoons unflavored gelatin
2  cups whipping cream
1/2 cup sugar
5 ounces bittersweet or semisweet chocolate
1/2 teaspoon vanilla extract

Directions: 

1. Pour milk into a small bowl, sprinkle gelatin over the top, set aside for 2-5 minutes. 
2. Place a medium saucepan over medium heat, stir in cream, sugar and vanilla. Bring to a low boil.
3. Add chocolate and whisk until melted. Whisk the milk/gelatin mixture into chocolate cream mixture. Whisk until gelatin has dissolved. 
4. Transfer to ramekins, or nice glasses for serving.
5. Cover and chill at least 8 hours, or overnight.

Nestle Florentine Cookies:

Ingredients

2/3 cup unsalted butter
2 cups quick oats
1 cup granulated sugar
2/3 cup flour
1/4 cup dark corn syrup
1/4 cup milk
1 tsp vanilla
pinch of salt
1 1/2 cups dark or milk chocolate

Directions:

Preheat oven to 375 F (190 C) 
Prepare your baking sheet with silpat or parchment paper

1. Melt butter in a medium saucepan, then remove from the heat.
2. To the melted butter add oats, sugar,  flour, corn syrup, milk, vanilla, and salt. Mix well.
3. Drop a tablespoon full, three inches apart, onto your prepared baking sheet. Flaten slighty with the back of your tablespoon, or use a spatula. 
4. Bake in preheated oven for 6-8 minutes, until cookies are golden brown. Cool completely on the baking sheets. 
5. While the cookies are cooling melt your chocolate until smooth either in the microwave (1 1/2 minutes), or stovetop (in a double boiler, or a bowl that fits atop a saucepan filled with a bit of water, being sure the water doesn't touch the bottom of the bowl).
6. Peel the cookies from the silpat or parchment and place face down on a wire wrack set over a sheet of wax/parchment paper (to keep counters clean). Spread a tablespoon of chocolate on the bottom/flat side of your cookie, sandwiching another (flat end)cookie atop the chocolate. This recipe will make about 2 1/2 - 3 dozen sandwiched florentine cookies. You can also choose not to sandwich yours, in which case, drizzle the tops with chocolate (over your wax paper).