Thursday, December 31, 2009

Chocolate Nemesis


Nemesis:nem·e·sis [ némməssiss ] (plural nem·e·ses [ némmə sz ]) noun
Definition:
1. unbeatable opponent: a bitter enemy, especially one who seems unbeatable
2. source of harm: a source of harm or ruin
3)deserved punishment: punishment that is deserved, especially when it results in somebody's downfall

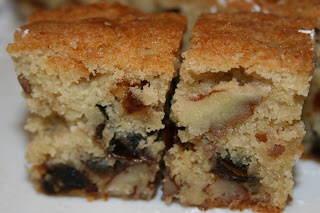
I'm speachless.....I'm almost embarrassed to try to describe this bliss. Its dark... its sultry...and  its truly sinful. This would certainly be a dessert to make for Valentine's Day. It should be shared....devoured. Chocolate Nemesis is certainly like nothing I have ever had before. It is flourless...so therefore, I'm calling it low carb :) LOL! Not hardly! It is like taking the inside of the richest truffle and slicing it up in cake form. I'm not one of those people that likes to use the term "too rich." But, I must say I had to bite my tongue on this one. The words almost passed my lips. Almost..

The first time I ever had this rich dessert was at Thanksgiving. My sister in law brought it. I like to give her a hard time, because she always brings Deviled Eggs (very good deviled eggs) to family functions.Then a few times a year, she will knock us all down with something like Chocolate Nemesis. She's a great cook, and she quickly reminds us of it when she pulls something like this on us.

Start your New Year off with Chocolate Nemesis. This is certainly my Nemesis...unbeatable opponent...bitter enemy. Yes, that will sum it up on Monday when my pants don't fit anymore. Enjoy!

Chocolate Nemesis
Adapted from Great Women Chefs of Europe
Recipe by Rose Gray & Ruth Rogers

Ingredients:
12 ounces dark baking chocolate, broken into small pieces(I used 4-Lindt 85% Cocoa Bars- found on the candy isle-not baking isle)
5 eggs
1 cup plus 2 tablespoons superfine sugar-(I just used regular, granular sugar, with great success)
2 sticks softened  butter-(no substitutes)
1 cup water
Extra butter for greasing pan, flour for sprinkling pan
Preheat the oven to 300°F. Line an 8-inch diameter shallow cake pan 2 inches deep with nonstick baking paper (parchment paper), then grease it with butter and sprinkle with flour. Beat the eggs with one third of the sugar until the mixture quadruples in volume (this operation will require beating for around 10 minutes with an electric beater). Heat the rest of the sugar in a saucepan with 1 cup water until the sugar dissolves into a syrup. Add the chocolate pieces and the butter. Mix well. When smooth, remove from the heat and leave to cool. Pour the mixture over the eggs while it is still slightly warm and continue to beat gently until it is smooth (no more than 20 seconds). Pour the mixture into the prepared cake pan and place the pan in a roasting pan of hot water. The water must come right up to the top of the mold, so that the cooking is uniform.


Bake it for 30 minutes in the oven until it has set. Check for doneness by gently placing the palm of your hand on the surface. If it is not set, continue cooking. Cool the cake in the pan before turning upside down to unmold onto a cake plate.

*I had to bake my Chocolate Nemesis for about 50 minutes. I would use a 8-9 inch springform pan to make unmolding easier.

Wednesday, December 30, 2009

Boyfriend Cookies


Boyfriend Cookies. Yes, that's right. Why do I call them Boyfriend Cookies? Well...for several reasons,
 1)They're so good, they just MIGHT land you a boyfriend 2) They're sooo good, you might trade your boyfriend for one more cookie :)  3) They're so good, you might just forget you want/need a boyfriend. But also, not to be forgotten 4)If you have a boyfriend, and he doesn't like these, it might be a good indicator that you need to kick him to the curb....because something has just got to be wrong with him!! They are that good :)


OK, seriously, these are so yummy. This was one of my own concoctions. They start with a gooey rich chocolate chip cookie. Then they are filled to the brim with peanut butter chips, white chocolate chips, Reese's pieces and M&M's. There is just enough dough to hold together all the candy. Isn't that really the way it should be! They just have so many fabulous ingredients, how could you go wrong?? You very well may go into a sugar comma with this one. But trust me, its worth it! This is certainly one of those recipes that you should just go ahead and hot glue it to your hiney. Because, as I've said before, that's where it will be residing anyways. Enjoy!
 
Boyfriend Cookies
 
Ingredients


1 cup butter, softened

3/4 cup packed brown sugar

1/4 cup white sugar

1 (3.5 ounce) package instant vanilla pudding mix

2 eggs

1 teaspoon vanilla extract

2 1/4 cups all-purpose flour

1 teaspoon baking soda

2 cups chocolate chips (1 cup milk choc & 1 cup semisweet)

1/2 cup white chocolate chips

1/2 cup peanut butter chips

1/2 cup M&M's

1/2 cup Reese's Pieces

Directions

1.Preheat oven to 375 degrees F (190 degrees C).

2.In a mixing bowl, cream butter and sugars. Add pudding mix, eggs and vanilla. Combine flour and baking soda; add to creamed mixture and mix well. Fold in chocolate chips and remaining candy.

3.Drop by tablespoonfuls onto ungreased baking sheets. I usually use a small spring-loaded cookie scoop. Bake for 10 to 12 minutes or until lightly browned.  Cool on wire racks.

Monday, December 28, 2009

Cookies N' Cream Fudge


I've been trying to take a little cooking siesta these last few days after Christmas, but I think I've refrained as long as I am capable . The irony surrounding my little "sweets" cooking blog to most of my friends lies in the fact that I have been on a low carb diet for about 9 months. So, my hobby tends to conflict with my dieting lifestyle at times. I have to cook it, photograph it, and try to find someone to gift it to before I confince myself the breakdown of certain ingredients could be considered low carb. Like Butter....its low carb. So if the recipe is primarily made of butter, that makes the whole concoction low carb. Right? Yeah, right. Kind of like a diet coke cancels out a snickers bar :)

Well, this recipe is certainly not low carb. There isn't even any butter to try to sway it over to the low carb side.
I made this recipe specifically for a friend of mine that loves Cookies N Cream Fudge. If you prefer white chocolate, this recipe is for you.  My little one prefered this to all the Christmas candies/cookies that I made this year. It is very easy to make. I do still use my candy thermometer and cook it until it reaches 234 degrees. Also, make sure to use high quality white chocolate. Do not use vanilla baking chips. I have tried this before and it did not set up. I do not like eating my fudge with a spoon. I'm not saying I won't do it. I'm just saying I'd rather not :) Enjoy!

Cookies N Cream Fudge
c/o Eagle Brand Website

Ingredients
3 (6 ounce) packages white chocolate baking squares
1 (14 ounce) can EAGLE BRAND® Sweetened Condensed Milk
1/8 teaspoon salt
3 cups coarsely crushed chocolate creme-filled sandwich cookies

Directions
1.In heavy saucepan, over low heat, melt white chocolate squares, sweetened condensed milk and salt. Bring to a boil. Cook until mixture reaches 234 degrees. Remove from heat; stir in crushed cookies.

2.Spread evenly into wax-paper-lined 8-inch square pan for thick fudge or 9x13 for a normal layer. Chill 2 hours or until firm.

3.Turn fudge onto cutting board; peel off paper and cut into squares. Store leftovers covered in refrigerator. (If you cook to 225 degrees, the fudge will set up enough to be left

Friday, December 25, 2009

Chocolate Chip Pecan Coffee Cake


Merry Christmas!! And in the words of my 4 yr old "And Happy Birthday Baby Jesus!" Try to take a moment today to remember that "He is the Reason for the Season!"
Hope everyone is having a wonderful Christmas. Wanted to pass along one of my favorite recipes. This recipe nearly threw me off my low carb diet when I first made it. It was the first dry carb that I felt I may not be able to stop consuming before it was all gone. Eventually, I had to take the remainder and put it in the freezer. And, it does freeze very well. This makes a huge cake or you can bake it in mini loaf pans if you want to give several gifts. This dense sweet cake sprinkled with cinnamon, sugar and pecans would make the perfect addition to your Christmas breakfast. Enjoy!!


Chocolate Chip Pecan Coffee Cake
Ingredients


1 cup butter or margarine, softened

1 (8 ounce) package cream cheese, softened

1 1/2 cups sugar, divided

2 eggs

1 teaspoon vanilla extract

2 cups all-purpose flour

1 teaspoon baking powder

1/2 teaspoon baking soda

1/4 teaspoon salt

1/4 cup milk

1 cup semisweet chocolate chips

1/4 cup chopped pecans

1 teaspoon ground cinnamon

Directions

1.In a mixing bowl, cream the butter, cream cheese and 1-1/4 cups of sugar. Beat in eggs and vanilla. Combine the flour, baking powder, baking soda and salt; add to creamed mixture alternately with milk. Stir in chocolate chips. Pour into a greased 9-in. springform pan. Combine the pecans, cinnamon and remaining sugar; sprinkle over batter.

2.Bake at 350 degrees F for 50-55 minutes or until a toothpick inserted near the center comes out clean. Cool for 15 minutes. Carefully run a knife around edge of pan to loosen. Remove sides of pan. Cool completely before cutting.
 
"For unto you is born this day in the city of David a Saviour, which is Christ the Lord.  And this shall be a sign unto you; Ye shall find the babe wrapped in swaddling clothes, lying in a manger. And suddenly there was with the angel a multitude of the heavenly host praising God, and saying, Glory to God in the highest, and on earth peace, good will toward men." Luke 2:11-14


Wednesday, December 23, 2009

Peanut Butter Haystacks


I am about ready to clock out on this cooking gig until next year.  So, if you are feeling the same way here's a super simple recipe. You could even let your kids make it. I'm not saying I'm that brave. But, you could let your kids make it :) This makes a ton of haystacks. It would make a nice Christmas treat for your coworkers, neighbors or friends. Enjoy!

Peanut Butter Haystacks
Ingredients:
1 cup creamy peanut butter
2 bags butterscotch baking chips
1 large bag chow mein noodles

Melt peanut butter over medium heat. When creamy, add in butterscotch chips. Stir until melted. Add in chow mein noodles. Mix to coat. Drop by tablespoon onto waxed paper. Cool and allow to solidify.

Tuesday, December 22, 2009

Thumbprint Cookies


Whew! Can you believe it is already Dec. 22nd? I thought I had it all together due to the fact that I did all my Christmas shopping in July. Unfortunately, I become too relaxed in the holiday season and now I'm behind! Lots to do! Plus I have to get a birthday cake together today for my brother and his oldest little boy. Can you believe they share the same day for their birthday? My family cannot seem to space their birthdays out. My brother's birthday is today, my mom's is Jan 5th, mine is Jan 6th and my dad's was Jan 10th. We just have birthday, after birthday, after birthday. So it was rather comical when my nephew was born on the same day as my brother's birthday. I, of course, had to be the odd ball when having my children. They are both June babies. But...I did keep them close in date. They are exactly 3 years and 3 days apart. My point about all that was that I had lots to get done today so I was going to keep my post short and not ramble as I just did :)
Todays recipe is probably one of my favorite Christmas cookies. I make this every year. My only complaint is that the recipe never makes enough. I always end up gifting them all away and I never have any left. These can be made with any kind of jelly/preserves. I usually make mine with apricot preserves. I do recommend to make sure that you use seedless raspberry, if you must have raspberry. Chalk that one up to a lesson learned! Enjoy!

Thumbprint Cookies
Ingredients:
1 stick butter
1/2 c sugar
1 egg yolk
1 t vanilla
1/2 tsp salt
1 1/2 c flour

Preheat oven to 300 degrees.
Cream together:
1 stick butter
1/2 cup sugar

Add:

1 Egg yolk
1 t vanilla
1/2 t salt
Blend in:

1 1/2 cups flour

Form into small balls. Place on ungreased cookie sheet. Indent balls with finger or the back of a measuring spoon. Fill with jelly (strawberry or raspberry are good, but any kind will work).

Bake at 300 degrees for 15 minutes. Do not brown.

Monday, December 21, 2009

Creamy Peanut Butter Fudge


OK, one more recipe for today. This peanut butter fudge is so easy! I love candy-making almost as much as baking. If you use a candy thermomether, you will almost guaranteed that your fudge will be the right consistency (i.e. it will actually set up so that you can cut it into squares). Unless it is humid.....or raining.....or you walk away for a moment and let it burn. Well, ok, there is no guarantee, but you will atleast have a shot. If it doesn't set up, put it in the fridge and eat it with spoon. It may not be appropriate for gifting, but its still yummy. I will say, I have never had a fudge made with marshmallow cream not set up. Some call it "Fool proof fudge." And, as a side note, fudge freezes very well. Enjoy!

Creamy Peanut Butter Fudge
Ingredients
4 cups white sugar
1 cup light brown sugar
1/2 cup butter
1 (12 fluid ounce) can evaporated milk
1 (7 ounce) jar marshmallow creme
1 (16 ounce) jar peanut butter
1 teaspoon vanilla extract
Directions
1.Grease a 9x13 inch baking dish.
2.In a medium saucepan over medium heat, combine sugar, brown sugar, butter and evaporated milk. Bring to a rolling boil, stirring constantly, and boil for 7 minutes (234 degrees). Remove from heat; stir in marshmallow creme until well incorporated and melted. Let Cool to about 110-125 degrees (about 8 minutes). Stir in peanut butter and vanilla until smooth; spread in prepared pan. Let cool before cutting into squares.

Christmas Cupcakes


As I started putting together a little box of goodies for my husband's work, I decided for some reason that I just had to send cupcakes. Who knows why? You know there is certainly no rhyme or reason to my thought process. Perhaps, I thought I didn't have enough to do or maybe I am just continually finding things to do to put off wrapping the mound of Christmas presents staring at me from down the hall. I really am going to wrap them, but the sooner I wrap them, the sooner my 18 month old will either unwrap them, use them as a step stool or stick them in the toilet. I'm really not just procrastinating....really.
Moving on, since I had to make cupcakes, I wanted them to seem really Christmassy (I know its not a word). Looking back at my recent posts, I drew inspiration from my tie-dyed cake and decided I would do swirled Christmas cupcakes. And it worked! Here's how I did it:
Preheat oven to 350 degrees. Line muffin tins with cupcake liners. Mix together a white cake mix following the directions on the box. Then, equally divide the mixture into 3 bowls.
You will want to use gel food coloring. It looks like this: You can purchase it here. Leave one bowl white, color one red and color one green. They will darken as they cook. It will look like this:

Now, you will put one heaping tablespoon of each color cake batter into each cupcake liner. Your liners will be about half full. Your unbaked cupcakes will look like this:
Then, take a toothpick and swirl through the batter of each cup several times. Just swirl it, don't mix it together completely. Bake at 350 degrees for 20 minutes or until a toothpick comes out clean when inserted in the center. Let cool completely. Frost with your favorite frosting. This is my favorite:

White Icing
Ingredients
4 cups confectioners' sugar
1 cup shortening
2 tablespoons milk
2 teaspoon clear imitation vanilla extract
1 tablespoon almond extract
white corn syrup

Directions
In a large bowl, combine sugar, shortening, water and extracts. Beat on low speed to combine, then beat on medium speed for a full five minutes.Drizzle in corn syrup until the icing starts to look glossy and fluffy. You may also need to add a little more milk to get it to fluff up. It won't look like Icing at first, but keep the mixer going for a full fifteen minutes. Yes, 15 minutes! Ice cake or cupcakes and Enjoy!

Fill decorating bag with icing and frost cupcakes as desired. The finished product will look like this:

Enjoy!

Sunday, December 20, 2009

Magic Middles


I'm so glad that I kept working with these cookies. They were not feeling so "magical" for a while there. Quite honestly, these cookies were so messy when I first started rolling the dough, I nearly just slung them out the window. Can we say squirrel food?!?! But, I really wanted them to work. The recipe looked so good. Unfortunately, the more I rolled , the more my hands looked like they had been covered in tar. Finally,just as I was about to accept defeat, I went to wash my hands. But then my OCD-ness kicked in and I went back to the dough to give it just one more chance to cooperate. Can you believe with just that little bit of water on my hands (that I had neglected to dry off ), the dough did not stick anymore. After I picked my jaw up off the floor, I continued rolling my little chocolate cookies with ease. I don't know why I didn't think of it. Its my number one tip for rice krispie treats. I always say "Wet your hands, and that marshmallow goo won't stick to you." So just remember to keep that in mind when making these yummy cookies. It will save you a world of frustration.
The simplicity of the ingredients is probably what attracted me to this recipe. You use brownie mix. At this stage of the Christmas baking, I'm all about ease. The worst part of this was the rolling the chocolate dough, but after I realized keeping my hands wet helped the dough not to stick, it was easy sailing from that point forward. If you love peanut butter and chocolate, these cookies are absolutely worth the effort. Enjoy!

Magic Middles
INGREDIENTS
1 (19.5-oz.) box Fudge Brownie Mix
1/4 cup butter or margarine, melted
4 oz. cream cheese (from 8-oz. pkg.), softened
1 egg
1 cup powdered sugar
1 cup creamy peanut butter

DIRECTIONS
1. Heat oven to 350°F. In medium bowl, beat brownie mix, melted butter, cream cheese and egg 50 strokes with spoon until well blended (dough will be sticky-they weren't joking about this!).
2. Wet hands slightly or they will look like this (and it will only get worse):
On a side note: Is it just me or does my hand look fat in this picture? Maybe it was just the chocolate :)
Roll dough into 2" balls (sorry Momma, sometimes there's just no other term to be used:) Keep hands damp while rolling. Set aside.
3. In small bowl, mix powdered sugar and peanut butter with spoon until mixture forms a ball. With hands, roll rounded teaspoonfuls peanut butter mixture into 24 balls. Take chocolate ball and lightly flatten it in your hand and wrap around a ball of peanut butter dough. It will look like this as you start to wrap your chocolate around your peanut butter::


4. Bake at 350°F. for 10 to 14 minutes or until edges are set. Cool on cookie sheets at least 30 minutes.
5. Remove from cookie sheets.


Now, you have to bite into one to see what all the "Magic" is about! These technically could have used a little more time to cool, but I had a baby dangling off my leg so I had to hurry. Let yours cool all the way.

Friday, December 18, 2009

Gingerbread Men


I know, I know, two posts in one morning?!? But, its really early and I can't do anything without waking everyone in the house up and compromising my precious time alone without someone wanting to dangle from my limbs. So, I thought I'd catch up on my blogging.
After making my snowflake cookies a few days ago, I had some leftover royal icing that I hated to throw away. So I searched online for a gingerbread cookie recipe. I can't believe I've never taken the time to make gingerbread men. Isn't that suppose to be a Christmas tradition? Doesn't everyone make gingerbread men at Christmas? OK maybe not in real life, but it seems like a good idea!
So, I found a recipe online and I tweaked the recipe a bit since these were for my little girl's classmates. If you have never had real gingerbread, it can be extremely spicy and bold. Not a favorite with most kids. So, I used honey to cut some of the molasses flavor. That seemed to do the trick. They still had a gingerbread flavor, but much more mild. The kids seemed to enjoy them.
These would be perfect to let your little ones decorate. Just make sure to tie the end of the decorating bag off with a rubber band. Now.....just ask me how I learned that little tidbit of information. Unfortunately, it was a lesson learned from experience :)
Enjoy!

Gingerbread Men
Ingredients
1/2 cup shortening
1/2 cup packed brown sugar
3 1/4 cups sifted all-purpose flour
1 teaspoon salt
1 teaspoon baking soda
1/2 teaspoon ground cinnamon
1/2 teaspoon ground ginger
1/2 cup molasses (unsulfered, if possible)
1/4 cup honey
1/4 cup water
Directions
1.Cream shortening and sugar. Sift flour with salt, soda and spices. Blend flour mixture into creamed mixture alternately with molasses, honey and water. Chill at least 1 hour.
2.Preheat oven to 350 degrees F (180 degrees C).
3.Roll dough to 1/4 inch thick. Cut with large 6-8 inch gingerbreadmen cookie cutters. Lift onto lightly greased cookie sheet withspatula.
4.Bake above oven center for about 12 minutes or until cookies spring back lightly in center. Do not overcook, they won't stay soft. Remove from sheets. Cool on wire racks. Makes 10 men 6-8 inches tall. After cooling, decorate with royal icing. You could also make a hole at the top of the gingerbread man before baking and use them as ornaments.

Royal Icing:
3 tablespoons meringue powder
4 cups sifted confectioners' sugar
6 tablespoons water
1/4 tsp vanilla (optional)
Beat together for 7-10 minutes until peaks form.

Thursday, December 17, 2009

Food For the gods


I found it! I finally found it! Most of you have no idea what I am talking about, but my mother knows. Let me explain. I have a neighbor that always brings us a goody bag at Christmas. This neighbor is a fabulous cook! Most of the things she makes are traditional southern Christmas staples. There are always sausage balls, chex mix, chocolate chip cookies, a few brownies, but then there is this little bag of square shaped cookies that are covered with powdered sugar. I decided last year after Christmas, that I was going to figure out what the recipe was to that little square. The problem was that the flavor was so mild, it was hard to determine exactly what I was dealing with in regards to ingredients. At first it seemed there was chocolate, but then after several recipes, I realized, that just wasn't it. So then it dawned on me that it was dates. But, I didn't think I liked dates. Well, apparently I do. Then, I could not figure out how the lady next door was getting these cookies square. All my cookies turn out round. Well, hmmm, how else would you get a square cookie. Hello?!?! Yes, thats right, you cut them into little squares. Can you tell the effect the children have had on my reasoning skills?
To make a long story short, I was browsing through a recipe site this morning and I happened upon this recipe for something called "Food For the gods." Well, what a fitting name. I could not believe that there before my very eyes were these stupid square confections that I had been trying to make for nearly an entire year. Oh, I know I could have called the lady next door. I know I could have saved myself countless trial cookies and an entire year worth of thinking about it. But...I'm stubborn like that. Stubborn...Obsessive-compulsive...Anti-social...whatever you want to call it. But in the end, I found it! And after I found it, I made it, and then I devoured it!!
These little treats are a very dense almost cake-like square. They are very rich and dotted with nuts and dates. If you think you don't like dates, give these a try anyways. You might be pleasantly suprised!

Food For the gods
Ingredients
8 ounce box, Chopped Pitted Dates, chopped coarsely through after unpackaging
½ teaspoons Salt
¼ teaspoons Baking Powder
2 cups All-purpose Flour
1 teaspoon Vanilla
4 whole Eggs At Room Temperature
¾ cups Packed Brown Sugar
¾ cups White Sugar
1-½ cup Butter
1 cup Pecans, Chopped
Preparation Instructions
1. Preheat your oven to 350 degrees F.
2. Melt the butter and let it cool. Take 2 tablespoons of the melted butter and brush your pan (one 9×13 pan or two 8×8 pans), making sure to grease the sides as well. I lined my pan with foil and then buttered the foil. Makes for easier clean up!
3. Coarsely chop the dates, and pecans. Set them aside in a bowl.
4. Sift the flour, salt, and baking powder into a bowl. Set aside.
5. Mix butter and sugar until well incorporated.
6. Add the eggs one at a time, mixing well after each addition.
7. Add in the vanilla.
8. Reserve ¼ cup of the flour mixture. Dredge the date and nut mixture with the reserved flour. Use more of the flour mixture if needed.
9. Mix in the rest of the flour mixture with the wet ingredients. Do this gently, by hand, until just incorporated.
10. Fold in dredged dates and nuts with the batter.
10. Pour the batter (it will be very thick) onto the buttered pan(s).
11. Bake for 30 or more minutes, until light golden brown. It can take 40-60 minutes sometimes to cook, so keep checking. The bars are done when a toothpick inserted in the center comes out with moist crumbs.
12. Let cool, and cut into small squares or cubes.This is what the squares look like before rolling in sugar:

After burning your mouth on the hot squares, because you didn't let them cool properly,roll in powdered sugar. Store in an airtight container.
And, if you give these as gifts, include the recipe so people can make them whenever they have a craving. You very well could save them a whole years worth of frustration :)

Tuesday, December 15, 2009

My Favorite Chocolate Chip Cookies


I don't think I have ever run across a person that doesn't like Chocolate Chip Cookies. Young or old, affluent or not...everyone loves a simple chocolate chip cookie. Now, that said, everyone also has their own opinion about what makes the "perfect" chocolate chip cookie. Some say crunchy, some say chewy, nutty or gooey. There are a million recipes out there for that perfect cookie. But, my favorite is a big cookie loaded with chocolate chips and somewhere between gooey and chewy. This recipe brings back childhood memories. Though, I'm not exactly certain why. I can remember one very specific time my mom making Chocolate Chip Cookies, but they were made from Tollhouse refrigerated dough. Its not exactly like we were spending a lot of time baking when I was a kid. Don't get me wrong, my mother is a wonderful cook. But, my brother and I both taught ourselves to cook (as pretty young children) at our parents office, while they where working. Its a wonder we didn't burn the place down. Perhaps thats what they were hoping for on the many nights they worked until midnight :) Ahhh, the joys of being self-employed. Sorry about that, side tracked onto memory lane for a moment. So, who knows why chocolate chip cookies conjure up memories of childhood. Maybe its what we wanted our childhood to be or what we want for our own children. I'd love for my girls to have sweet memories of standing at the kitchen counter helping to bake cookies and getting the first one off the tray just as they were cool enough to eat. That comforting scent of brown sugar and chocolate baking. Lots of fun and laughter and less scolding for dumping the bag of powdered sugar in the middle of the kitchen floor. Its always fun baking with a 4 yr old and an 18 month old :)
So what's so special about this recipe. Well, there is the secret ingredient. Oh, you want to know what the secret ingredient is? The secret ingredient that makes this cookie different is.....are you ready for this......Instant vanilla pudding mix. Isn't that weird?!?! Seriously, that's what makes this cookie different. It gives it texture, and tons of flavor. After much doubt, I finally tried this recipe. And it has been my favorite chocolate chip cookie ever since. It met all my requirements for the perfect chocolate chip cookie. If you try it, I hope you love it too! Enjoy!

The Perfect Chocolate Chip Cookie

Ingredients
1 cup butter, softened
3/4 cup packed brown sugar
1/4 cup white sugar
1 (3.5 ounce) package instant vanilla pudding mix
2 eggs
1 teaspoon vanilla extract
2 1/4 cups all-purpose flour
1 teaspoon baking soda
1 cup Milk Chocolate Chips
1 Cup Semisweet Chocolate Chips
1/2 c pecans(optional)
Directions
1.Preheat oven to 375 degrees.
2.In a mixing bowl, cream butter and sugars. Add pudding mix, eggs and vanilla. Combine flour and baking soda; add to creamed mixture and mix well. Fold in chocolate chips.
3.With a large cookie scoop, drop onto ungreased baking sheets.These will be about the size of golf ball. Bake for 10 to 12 minutes or until lightly browned. Do not overbake. These will look slightly underbaked when you take them out of the oven. Let cool for a few minutes before transfering to wire cooling racks.

Monday, December 14, 2009

Its Beginning To Look A Lot Like Christmas...


Until just a few months ago, I had never made a lot of hand decorated sugar cookies. They are terribly time consuming and my patience...well, lets just say more often than not, the past cookies have ended up flung out the back door for the squirrels to eat before the icing ever had a chance to dry. Very frustrating! I'm not sure if I just happened upon the right recipes that harmoniously made nice cookies, or if God finally decided to have a little pity on me by spontaneously providing me with the necessary capabilities of creating the cookies. You know He does have a funny little sense of humor like that:) Whatever the reason, these cookies roll out nicely. And the icing is very easy to work with. I'll give my steps for the decorating since that is the most difficult part for me. Keep in mind, the icing in this recipe is royal icing. Royal icing hardens so that the cookies can be stacked for gifting/storage. Not break a tooth hard, but hard enough. You must work quickly and keep the icing in the bowl covered while not using or it will dry out and crust over.
You will not enjoy trying to decorate with crusty icing. You will have squirrel food for sure! Speaking from experience here :) Enjoy!

Sugar Cookies for Cutouts
Ingredients
1 1/2 cups butter, softened
2 cups white sugar
4 eggs
1 teaspoon vanilla extract
5 cups all-purpose flour
2 teaspoons baking powder
1 teaspoon salt
Directions
1.In a large bowl, cream together butter and sugar until smooth. Beat in eggs and vanilla. Stir in the flour, baking powder, and salt. Cover, and chill dough for at least one hour (or overnight).
2.Preheat oven to 400 degrees F (200 degrees C). Roll out dough on floured surface 1/4 to 1/2 inch thick. Cut into shapes with any cookie cutter. Place cookies 1 inch apart on ungreased cookie sheets.
3.Bake 6 to 8 minutes in preheated oven. Cool completely. Ice with royal icing.

Royal Decorator Icing:
Ingredients
3 tablespoons meringue powder
4 cups sifted confectioners' sugar
6 tablespoons water
1 tsp of extract (vanilla, almond, peppermint, you choose)
Directions
1.Beat all ingredients at low speed for 7 to 10 minutes, or until icing forms peaks. More water can be added 1 tsp at a time until the right consistency is reached. Tip: Keep icing covered with a wet kitchen towel at all times. Icing can dry out quickly.

After cooling the cookies, you will want to fill a plastic decorator bag (fitted with a small round tip) about half full of the icing. Start by piping an outline on each cookie. When all the cookies are outlined. You will thin out some of the icing in a bowl with about a tablespoon of water or until it is pourable but not too thin. Pour into a plastic squeeze bottle (you can find these at Walmart in the cake/candy decorating dept). When the outlined icing is dry (about 10-15 min), use the squeeze bottle to fill in the outlines. I usually use a toothpick or skewer to help push the icing up to the edge of the outlines. If desired, sprinkle with sanding sugar. You can certainly leave the cookies like this, or after drying another 15 minutes or so, you can pipe additional decorations with the bagged icing and sprinkle with sugar again (if desired). You can add any embellishments your heart desires. I used pearl dragees and white sanding sugar on my snowflakes. I love the look of the monocromatic decorations. They look so pure and heavenly.I even added a few "M" monograms on some of these, since they were for a friend that had asked me to make them for her Office Christmas Party. I will certainly not say these cookies are easy or quick, but they are really fun. Perfect for the kids to help with! My Mary kept saying, "This is so fun, just so much fun!" So, if you have half a day to spend right here at the holidays, take a break and bake these cute cookies!!


Wednesday, December 9, 2009

A Recent Birthday Cake


From time to time, I like to pretend that I am Duff Goldman. You know who Duff Goldman is, right? If not, he's the guy they call "The Ace of Cakes" on Food Network. I joke about that, because I want to be the Ace of Cakes, but I lack a bit in the artistic department. And it is not from lack of desiring to be artistic. Well, that and I am a self taught cake decorator. No formal training. You know how I taught myself? I watched Youtube. I am nearly certain that you can learn to do almost anything on Youtube.

Anyways, my friend, Teri, (who gives me far more credit than is due) has enough faith in me to let me play around with my cakes for her kids' family birthday parties. She is not a fan of fondant, but she did not raise a fuss when I told her that's what I was doing on the entire surface of the cake. Though I do believe I may have heard her whince a little in the background on the phone. But, I promised to slather the cake with frosting underneath the fondant. I just can't figure out what the problem is with fondant. Its just sugar, but everyone treats its like its parsley and pushes it to the side. I have come to accept that it is to be used purely as decoration

Back to the cake, I decided to try a real cool and funky cake since the little girl was turning 10. Like I really know what a 10 year thinks is cool! Well, I took a guess and she seemed to be pleased. If I was a 10 year old girl I would have thought it was cool. Well, especially if I was a 10 year old girl in the 60's! I went retro with this cake. There was mod flowers (even zebra print flowers) and polka dots. But the best part, the actual cake part had a tie dyed effect. I got that idea here.Overall, I was pleased with the cake, and I had fun with it.
Here's the pics:

Frosted Marshmallow Bars


I first saw these great brownies on BakingBlonde's Weblog. She is a wonderful cook! She hasn't posted in a while, but her recipes are fabulous. I had a lot of compliments on these sweet treats at my jewelry party last weekend. Ok, so mainly the compliments were from my 4 year old, but a compliment is a compliment. They are very sweet and gooey. So if you only kind of like sweets, this may not be for you. They are worth the extra steps to make them, but if you were in a hurry, you could always use a packaged brownie mix instead of making it from scratch. Now, go make some of these gooey marshmallowy (I know that's not a word) treats and endulge!!

Frosted Marshmallow Bars
3/4 cup butter
1 1/2 cup sugar
3 eggs
1 tsp vanilla extract
1 1/3 cup flour
1/2 tsp baking powder
1/2 tsp salt
3 TBS baking cocoa
3-4 cups mini marshmallows

Preheat oven to 350.
Lightly grease a 9×13 pan with PAM
In a mixing bowl, cream the butter and sugar. Add eggs and vanilla beat until fluffy.
In a small bowl combine flour, baking powder, salt and cocoa. Stir to combine. Add the flour mixture to creamed mixture. spread in greased 9×13 pan.
Bake for 17-20 minutes. Remove from oven and sprinkle with marshmallows, return to oven 2-3 mintues, or just until marshmallows are soft.
Remove from oven. Using a knife dipped in water spread the metled marshmallows evenly over bars.

Frosting
3/4 stick butter
6 TBS Milk
1 1/4 cups sugar
1/2 cup mini marshmallows or 4-6 large marshmallows
1/2 cup Chocolate chips (maybe upto 3/4 cup depending how chocolatey you want it)

Combine ingredients (except marshmallows and chocolate chips) in medium saucepan and melt over medium low heat. Stir constantly until combined. Bring to a boil and boil for 1 minute.
Add marshmallows and chocolate chips
Stir until marshmallows and chips are melted.
Remove from heat. Allow to cool and thicken slightly (can set in sink of cold water to speed up process). Pour and spread over marshmallows on bars.
Allow to cool before cutting and serving

Monday, December 7, 2009

A Note Regarding the last Post

I had a friend make a very good suggestion last Sat. at my jewelry party regarding the Peanut Butter Cup Cookies. "Ms. Jeanne" (as my little ones like to call her) made the suggestion that she would use refrigerated cookie dough, instead of making the dough from scratch. We laughed about it when I said that was a great idea but it would not give me a real recipe to blog about :) But the more I thought about it, I felt I should mention it. Especially since the hectic holiday season is approaching. To be terribly honest, the week before Christmas when I'm throwing my Christmas trays together for the neighbors and I've already made 15 cookies, I may just throw a little refrigerated cookie dough in my pans and try that out!! There is absolutely nothing wrong with refrigerated or pre-packaged mixes to help get you out of the kitchen. Besides, Betty Crocker and that little Pillsbury fella' have been at this far longer than I have. Thanks for the tip Jeanne!

Note: Ms Jeanne has also been deemed the "Queen of Chicken Noodle Soup" by my very own husband. Apparently, she makes homemade noodles and uses fresh butchered chickens. So you can understand my suprise when this same sweet lady wanted to use refrigerated cookie dough to cut a few corners. LOL! Recipe of the day to follow later.

Friday, December 4, 2009

Peanut Butter Cup Cookies


I'm a little behind on my blogging. I guess the aftermath of Thanksgiving, remodeling, children, etc has gotten the best of me this last week. We had a great Thanksgiving. No major food flops, meltdowns, family squabbles, or children in the ER. With my 2 youngest nephews, the latter is always a possibility. Well, really just the youngest. And, it was up in the air for a second as to whether that little ER visit might occur since he thought it a grand idea to hold my ginormous excercise ball and jump off my little ones bed as though he were Superman. It's a wonder it didn't bounce him up through the ceiling. He did appear to hurt his arm a bit, but all was well. Thankfully his limbs are made of jello! In all seriousness, we did have so much to be thankful for this Thanksgiving!

On to the recipe! So, apparently I am all about my little mini muffin pans these days. I made these great peanut butter cup cookies in those cute little muffin pans. Again, I love the peanut butter/chocolate combination. These were quick, yummy and cute. And, for those attending my jewelry party, these will also be in attendance :)

Peanut Butter Cup Cookies
1 3/4 cups all-purpose flour
1/2 teaspoon salt
1 teaspoon baking soda
1/2 cup butter, softened
1/2 cup white sugar
1/2 cup peanut butter
1/2 cup packed brown sugar
1 egg, beaten
1 teaspoon vanilla extract
2 tablespoons milk
40 miniature chocolate covered peanut butter cups, unwrapped
Directions:
1.Preheat oven to 375 degrees F (190 degrees C). Freeze unwrapped peanut butter cups.
2.Sift together the flour, salt and baking soda; set aside.
3.Cream together the butter, sugar, peanut butter and brown sugar until fluffy. Beat in the egg, vanilla and milk. Add the flour mixture; mix well.
4.Shape into 40 balls and place each into an ungreased mini muffin pan.
5.Bake at 375 degrees for about 8 minutes. Remove from oven and immediately press a frozen mini peanut butter cup into each ball. Cool completely and carefully remove from pan. If you have a hard time removing these from the pan after cooling, stick the whole pan in the freezer for about 20 minutes and they will pop right out.
Note: You do not have to freeze the peanut butter cups, but I do think it makes them easier to work with. They do not melt as quickly. Enjoy!